I have a small mill machine that is perfect for bridge slotting. These small milling machines are a low cost way to do a wide variety of tasks.
| Official Luthiers Forum! http://www-.luthiersforum.com/forum/ |
|
| Saddle slotting http://www-.luthiersforum.com/forum/viewtopic.php?f=10101&t=45858 |
Page 1 of 2 |
| Author: | Mike OMelia [ Mon Jun 08, 2015 11:11 pm ] |
| Post subject: | Saddle slotting |
Curious to see jigs and techniques. Premounted before slotting, or fully slotted and drilled before mounting. Thanks Mike |
|
| Author: | klooker [ Tue Jun 09, 2015 5:31 am ] |
| Post subject: | Re: Saddle slotting |
I use Robbie's jig - https://www.youtube.com/watch?v=T8WAVvkxRsc . |
|
| Author: | Haans [ Tue Jun 09, 2015 7:10 am ] |
| Post subject: | Re: Saddle slotting |
Used to use the Stew mac jig. Works fine. |
|
| Author: | Greg Maxwell [ Tue Jun 09, 2015 8:02 am ] |
| Post subject: | Re: Saddle slotting |
I use the Stew Mac jig, it's one of my favorite tools. I greatly prefer to glue the bridge on and then route the slot. |
|
| Author: | johnparchem [ Tue Jun 09, 2015 8:07 am ] |
| Post subject: | Re: Saddle slotting |
Mostly use the stewmac jig on the guitar. I have also used a cross-vise in combination with my drill press off of the guitar. |
|
| Author: | kencierp [ Tue Jun 09, 2015 8:11 am ] |
| Post subject: | Re: Saddle slotting |
I have always slotted and drilled prior to assembly -- just makes sense to me. Many use a bottom cutting end mill in a drill press with an angled fence and two stops (a board clamped to the table) -- very simple process. |
|
| Author: | Tom West [ Tue Jun 09, 2015 8:22 am ] |
| Post subject: | Re: Saddle slotting |
Home made jig in the drill press. Tom |
|
| Author: | Cush [ Tue Jun 09, 2015 8:33 am ] |
| Post subject: | Re: Saddle slotting |
I have a small mill machine that is perfect for bridge slotting. These small milling machines are a low cost way to do a wide variety of tasks. |
|
| Author: | Terence Kennedy [ Tue Jun 09, 2015 10:05 am ] |
| Post subject: | Re: Saddle slotting |
I've been using Tony Karol's system the last few years.    For slotting on the guitar I use the Stew Mac jig. |
|
| Author: | DennisK [ Tue Jun 09, 2015 11:55 am ] |
| Post subject: | Re: Saddle slotting |
Jig? I don't need no stinking jig Two clamps directly on the bridge, so the bridge surface is flush with the clamp surface. Two more clamps to hold those down to the bench. Two more to hold the fence board down on top of the bridge holding clamps, and one more under the fence board as a shim. Only takes a minute to set up. Attachment: BridgeSlotSetup.jpg Attachment: BridgeSlotRouting.jpg I position the bridge on the guitar by measuring from the 12th fret to the saddle slot, laying the ruler along the 1st and 6th string paths to get the rotation just right. It's possible that the bridge could end up looking a little crooked doing it this way, but I've never had it happen. If the slot is routed at the correct angle relative to the front edge of the bridge, it should always end up nearly square to the centerline of the guitar. |
|
| Author: | Clinchriver [ Tue Jun 09, 2015 6:01 pm ] |
| Post subject: | Re: Saddle slotting |
Collings Saddle mill |
|
| Author: | Mike OMelia [ Tue Jun 09, 2015 10:00 pm ] |
| Post subject: | Re: Saddle slotting |
Thanks! |
|
| Author: | Glenn_Aycock [ Wed Jun 10, 2015 7:12 am ] |
| Post subject: | Re: Saddle slotting |
That Collins jig is pretty awesome. I am tempted to replicate it - I have several linear guides around the shop from old projects, but most are probably too long/heavy for a guitar. Drawer slides would probably work for the bearings, but I think you could build the entire fixture with pre-made 8020 components on the cheap (relatively - compared to Frank Ford's description of his version). I'm not familiar with industrial laser components, but I'm thinking of cannibalizing a laser level. For anyone who doesn't know, 8020 is the "erector set for grownups." You can make all kinds of jigs and fixtures using their components, and they are very reasonably priced. No association with them, btw. YMMV |
|
| Author: | Clinchriver [ Wed Jun 10, 2015 5:08 pm ] |
| Post subject: | Re: Saddle slotting |
Glenn_Aycock wrote: That Collins jig is pretty awesome. I am tempted to replicate it - I have several linear guides around the shop from old projects, but most are probably too long/heavy for a guitar. Drawer slides would probably work for the bearings, but I think you could build the entire fixture with pre-made 8020 components on the cheap (relatively - compared to Frank Ford's description of his version). I'm not familiar with industrial laser components, but I'm thinking of cannibalizing a laser level. For anyone who doesn't know, 8020 is the "erector set for grownups." You can make all kinds of jigs and fixtures using their components, and they are very reasonably priced. No association with them, btw. YMMV Yeah I made do with several gizmos utilizing my Dremel and the Dremel is by far the weak link. I have two guitars that will be getting the bridge slotted, next week or so and then I'll use the mill to permanently fix two build withs overly generous saddle slots |
|
| Author: | David Collins [ Wed Jun 10, 2015 9:03 pm ] |
| Post subject: | Re: Saddle slotting |
Slotting off the guitar is relatively simple (as well as much lower liability should anything not go perfectly), but I would endorse a router or laminate trimmer over the drill press slide. Glenn - if you have some decent tool making skills and machining equipment you may be able to make a version that will work well, but neither drawer slides nor 8020 components will be useful at all for this job. To be worth doing, this application requires precision bearings or rails. If you could salvage some good bearings from other equipment and machine your own components this will certainly save you some money, but it's not easy, quick, or cheap to make well (the parts alone for this one cost much more than Frank's version, just for some reference). |
|
| Author: | printer2 [ Wed Jun 10, 2015 9:29 pm ] |
| Post subject: | Re: Saddle slotting |
Did a few bridges with this one. Sort of a Dremel mill. 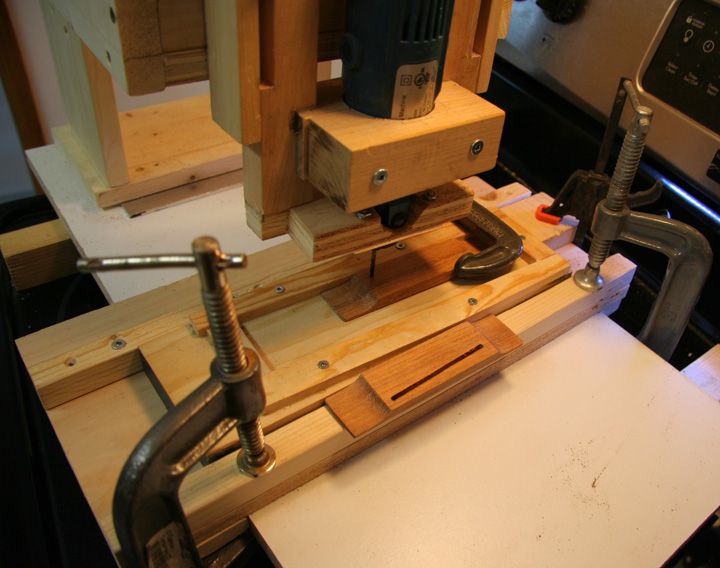 Multifunction. Needed to rout a truss rod slot with a thinner bit than I had for my router. Once set up just pass it back and forth dropping down the bit at the ends. 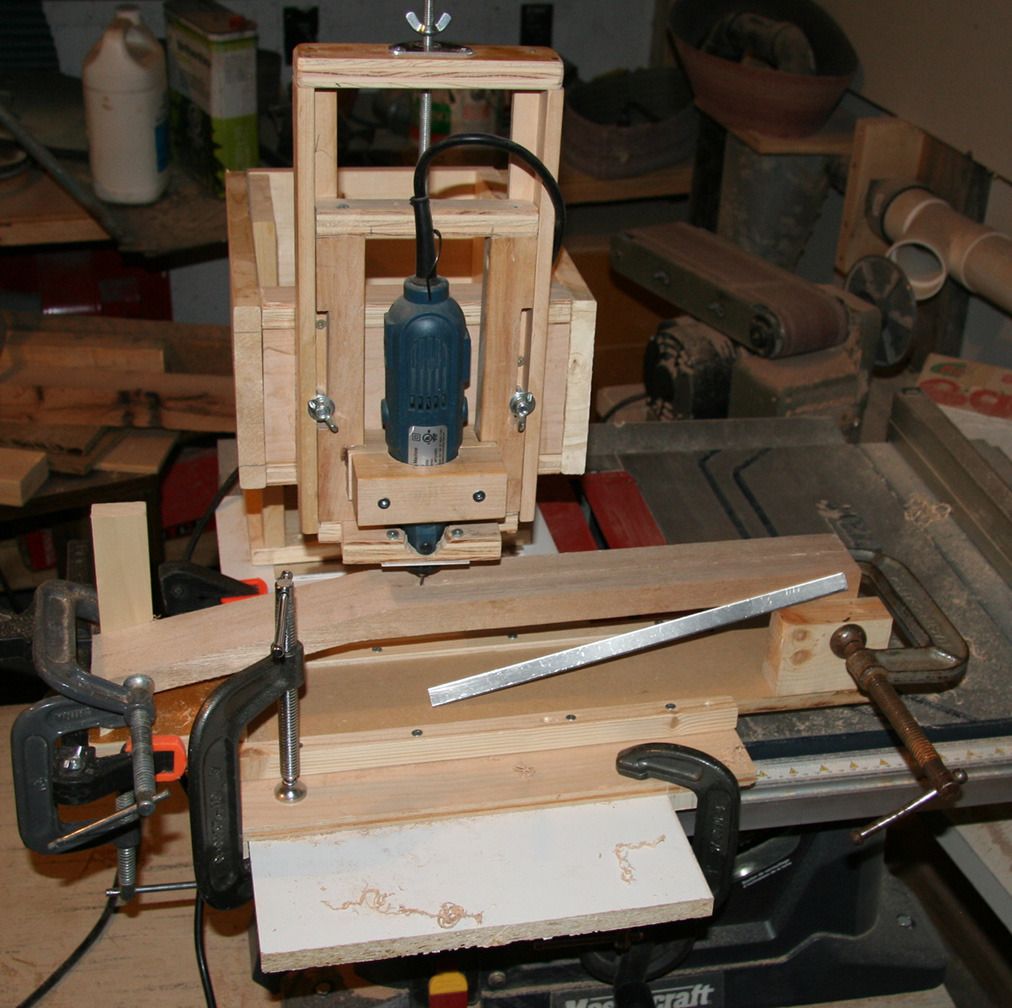
|
|
| Author: | Glenn_Aycock [ Wed Jun 10, 2015 10:25 pm ] |
| Post subject: | Re: Saddle slotting |
David Collins wrote: Slotting off the guitar is relatively simple (as well as much lower liability should anything not go perfectly), but I would endorse a router or laminate trimmer over the drill press slide. Glenn - if you have some decent tool making skills and machining equipment you may be able to make a version that will work well, but neither drawer slides nor 8020 components will be useful at all for this job. To be worth doing, this application requires precision bearings or rails. If you could salvage some good bearings from other equipment and machine your own components this will certainly save you some money, but it's not easy, quick, or cheap to make well (the parts alone for this one cost much more than Frank's version, just for some reference). Fair skills but mostly woodworking equipment at the moment. A buddy has a small mill and metal lathe, so they are accessible if necessary. I have some Isel rails and bearings, but I'm curious why you don't think the 8020 is suitable. Is there is too much slop in the mating surfaces? Maybe I should read the specs closer. Given that tolerances for woodworking are fairly loose in general, would a couple thousandths make much difference over 3-4 inches? I imagine at least that much error is added in layout and gluing the bridge. I also have a Bosch overarm router, which gets me part-way. I was considering a (possibly) pivoting platform mounted in the pin hole, on which I could mount the rail(s). Pivoting isn't really necessary, it's but an easy way to align the fixture.  By fixing the bridge with toggle clamps I would have to offset one or both ends for compensation, since the cut will always be parallel to the rail(s). A more elaborate clamping fixture might have a fine adjustment. |
|
| Author: | david farmer [ Wed Jun 10, 2015 10:39 pm ] |
| Post subject: | Re: Saddle slotting |
Unless the bearings are very high quality, I think no bearings are better. This rig works well just by being fanatical about straight and square when I made it. If you are comfortable with a table saw, a good Metal cutting blade will cut aluminum plate like butter. You can pre-load the fit of the router base by gently clamping the fence when you torque it down. Eliminating all play is the key to a smooth slot wall. Some day I'll upgrade it to linier bearings on a carriage but not until I can afford some good ones. If you make a rig that works with a bridge glued on, you will have something that works for repairs in the future. I wouldn't usea Rigid lam trimmer again though (POS) I just already had it. Use something that has an 1/8"after market collet available for it. Gotta find me a laser for the cool factor though. |
|
| Author: | David Collins [ Wed Jun 10, 2015 10:58 pm ] |
| Post subject: | Re: Saddle slotting |
What David Farmer said - either high precision bearings or just go with good straight and square guides. The 8020 systems are great for versatility, but without the addition of dedicated bearings are not the best for precise linear motion control (especially under load and vibration). |
|
| Author: | J De Rocher [ Thu Jun 11, 2015 6:43 pm ] |
| Post subject: | Re: Saddle slotting |
I route the saddle slot off the guitar using a jig that's pretty simple and gives dead on slotting. It's made it from scrap 1/2" and 3/4" maple ply. The L-shaped piece with the fence on the left below is clamped on top of the piece on the right to the bench top. I route the slot with a Colt in a Bishop Cochran base which gives a wide base and added weight for a stable cut. The jig doesn't have stops. I make pencil marks on the top piece to show where to start and stop the router travel. It sets up pretty fast, takes up very little room to store, is easy to use, and it cost very little to make. I haven't done it yet, but it would be easy enough to shim the bridge blank to route the slot with a small vertical angle.   
|
|
| Author: | Mike OMelia [ Thu Jun 11, 2015 7:46 pm ] |
| Post subject: | Re: Saddle slotting |
As the proud owner of a Bishop Cocheran Router Base, I feel we have finally gotten somewhere. Jay, would please post some words to explain? I really like what u are doing there. Mostly, I'm wondering how u assured centering of router on saddle line Mike |
|
| Author: | J De Rocher [ Thu Jun 11, 2015 9:17 pm ] |
| Post subject: | Re: Saddle slotting |
I layout my bridge with the saddle line representing the center of the saddle. I accurately measure the distance from the edge of BC router base to the center of the router bit. I then measure and position the top piece of the jig so that the side of the fence is located exactly that distance from one end of the saddle center line on the bridge blank. I repeat for the other end of the saddle center line and clamp the top piece of the jig in place and double check that nothing shifted while clamping. It's not hard to get the top piece positioned exactly where you want it to be. I purposely use the Irwin style clamps shown in the photos to avoid the tendency of cam clamps to pull things slightly out of position while tightening them. If you layout the construction of the jig accurately with 90 degree corners all the way around the outside edges of the top and bottom pieces and you position the angled block the blank rests against relative to the front edge of the lower piece, you can just do the first measurement described above and align the top piece so that the edges are square with the bottom. That will automatically give you the angle that matches the saddle line. I make both measurements to be safe though. I use 1/8" thick saddle blanks from LMI and a 1/8" downcut bit from StewMac. That combo gives a perfect fit. I route the slot in two passes: half depth and full depth. I don't use the plunge capability of the BC base. I set the bit depth and lock it and then tip the router into the cut near to one end of the slot. If you focus on keeping the router firmly against the fence, you get a perfect, clean cut. BTW, only the fence is 3/4" thick. The other parts are 1/2" ply. That gives enough height between the bottom piece and the surface that the router rides on to accommodate a useful range of bridge thicknesses. |
|
| Author: | Jimmyjames [ Fri Jun 12, 2015 4:33 pm ] |
| Post subject: | Re: Saddle slotting |
I just did it by hand an eye with patternmaker's tools: hand router for depth, carving tools, hand drill. Turned out fairly well. Everyone seems to have very complex setups. Of course I'm not making a bunch of guitars so this works for me. Cutting an a accurate, straight channel is not very difficult. |
|
| Author: | David Collins [ Fri Jun 12, 2015 6:51 pm ] |
| Post subject: | Re: Saddle slotting |
Jimmyjames wrote: I just did it by hand an eye with patternmaker's tools: hand router for depth, carving tools, hand drill. Turned out fairly well. Everyone seems to have very complex setups. Of course I'm not making a bunch of guitars so this works for me. Cutting an a accurate, straight channel is not very difficult. For making new bridges, I agree. Probably 1,001 simple and easy ways to do this. For cutting fresh slots in glued-on bridges it gets a bit more complicated. Modifying existing bridge slots gets more complicated yet. Modifying slots with full confidence that it will end up exactly as intended (like perfectly deepening an odd width slot without touching the existing walls), and being able to set it up perfectly in five minutes so a professional can actually make money, or not risk messing up a vintage piece, or be able to route a precise sub-slot within a through saddle slot for a transducer - this sort of stuff and more is what makes for a more complicated design (yet simple to use) setup. For cutting new slots on new bridges though, a couple of scraps of wood, some screws, clamps, and a router, and you should be able to whip up a fixture pretty simple. |
|
| Author: | meddlingfool [ Fri Jun 12, 2015 7:48 pm ] |
| Post subject: | Re: Saddle slotting |
 
|
|
| Page 1 of 2 | All times are UTC - 5 hours |
| Powered by phpBB® Forum Software © phpBB Group http://www.phpbb.com/ |
|